


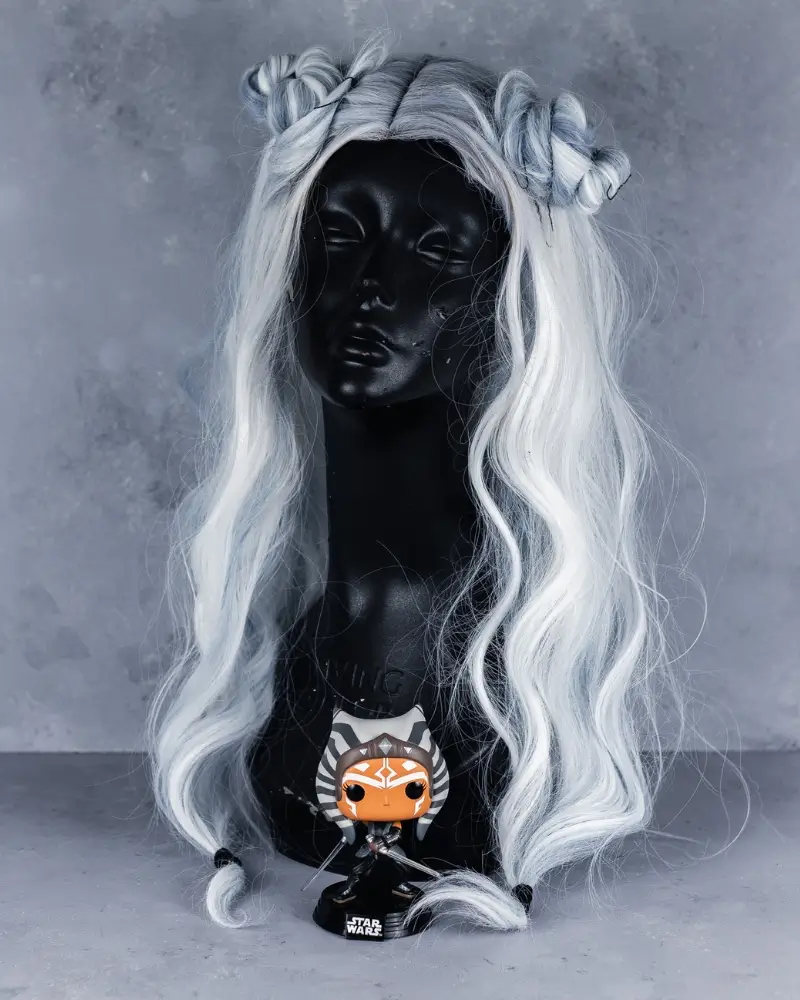
26 Aug How to Dye a Wig with RIT Dye for a Human Ahsoka Tano Costume
I’ve been known to make my own wigs when I can’t find what I need for a costume. Sometimes you just can’t find certain colors or styles and it takes a bit of creativity to create the look you want. Creating a wig for my human Ahsoka cosplay was no different. Instead of her blue and white headpiece, I decided to dye a white wig for a similar look. It turned out beautifully, so I thought I’d show you how to create a human Ahsoka wig with RIT Dye.
Who is Ahsoka Tano
If you’ve never heard of Ahsoka Tano, that’s okay. You will receive no judgment on this blog. You will not remember her from any of the six movies in the first and second Star Wars trilogies because she isn’t there. Ahsoka was created for The Clone Wars (an animated Star Wars story) and played a starring role alongside Anakin Skywalker, Obi-Wan Kenobi, Padmé Amadala, Palpatine, and others.
Her look is iconic, with two head-tails (Lekku) that sit on her head like a headpiece. It’s actually a fleshy appendage that grows as she grows. Like hair. It’s blue and white striped – almost like a tiger – and she has a headband on her forehead. Her clothing colors range from burgundy to blue to gray, depending on the specific time period in the story.
If you’d like to read more about her character, here’s a link to her info page on Wookiepedia, the Star Wars wiki page. It’s easy to say that I am a huge Ahsoka fan. I love everything about her strength, resilience, and overall outlook on life. So cosplaying her in any form is a true honor for me, and I do so with a reverence that I can’t begin to explain.
Making Cosplays | Costumes
I typically make all of my cosplays, with a few purchased additions here and there. One double award-winning costume has a red loc’d wig to go along with it. That Poison Ivy wig took me months to complete, and I haven’t created anything that intricate since. But because I wanted to represent a human version of Ahsoka with hair rather than Lekku, I needed a custom wig.
No one is really selling a blue striped wig, after all.
In the past, I have used RIT dye to color a wig for a Raven cosplay and I loved the way it turned out. I created a video that garnered thousands of views and comments, and 5 years after I posted it on YouTube I still receive questions and messages from viewers thanking me for helping them discover the art of dyeing wigs.
hashtag humble brag
So I thought a blog post would help you custom dye your own wig for a costume.
And it doesn’t have to be for a convention, either. Halloween is coming up and you may want to create a wig for your special costume. Or you may want to create a wig for another special occasion.
I mean Halloween is just one big outdoor convention, isn’t it? With candy.
HalloweenCon.
I said it first!
Before getting into the tutorial, I wanted to answer some questions you may have about RIT dye and the dyeing process.
What is RIT dye?
RIT dye is a household dye used to change or add color to fabric and other material using hot water. Made up of various acid, disperse and direct dyes, and sodium chloride, RIT dye is non-toxic and safe to use on a wide variety of fabrics and materials. It is also vegan and cruelty-free.
Dyes chemically apply color to materials.
Is RIT dye non-toxic?
Yes, RIT is non-toxic and safe to use on any material. With that being said, just don’t use it to season your food or drink it. The shades are, indeed yummy; but no need to test any theories.
I like to say use common sense when working with anything that has any chemical of any kind. The safe thing to do is to cover your surfaces, wear gloves, and try not to get dye in your eyes or other orifices.
Nope. Not going there.
Which dye do I use for which material?
There are two different types of RIT dye: all purpose and synthetic.
All-Purpose RIT dye is for natural fabrics. For example: cotton, wool, and silk. It can also be used on a couple of synthetic fabrics like nylon and rayon.
Synthetic RIT dye is for non-natural or man-made fabrics, like polyester, acrylic, acetate, plus blends that contain those fibers.
Can you really use RIT dye on wigs?
Yes. I’ve used RIT dye on many of my synthetic wigs and it works really well. I have also used it to dye fabric for my Sally dress and it worked like a charm.
I have only used RIT dye on synthetic wigs, not human hair wigs. It is because I don’t personally purchase human hair wigs. Synthetic wigs are made from man-made material – plastic or acrylic – created to mimic the look and feel of actual human hair.
That means that when I use RIT dye to dye my synthetic wigs, I have to use dye for synthetic material.
Synthetic hair wigs are made from strands of man-made materials, such as plastic or acrylic. Synthetic hair fibers are made to closely resemble the look and movement of human hair. If you use the all-purpose dye to try and color a synthetic wig, it won’t work. That’s the end of the sentence.
Does the wig have to be white?
I use white wigs so I can get the brightest, deepest color. Dyeing a white wig is just easier.
The general rule of thumb is that you can darken a lighter wig with no problem. If you’re thinking of dyeing a dark brown wig light blue or something like that, you’ll have some problems. Just like our real hair, you can’t lift the original color just by dropping a lighter color on top. You first need to strip the original color from the item.
And you’ll find that to be difficult with synthetic hair. Because no, you can’t bleach a synthetic wig. Please trust me on this, I tried. lol
So the lighter the wig, the greater your chances of getting the color you want.
Does the water have to be hot?
Yes, RIT’s instructions are very clear on that fact. You should have the water to almost boiling (200⁰F) for synthetic projects, which means you will need to use the stovetop method to boil the water.
Do you have to use the stovetop?
In my opinion, the stovetop method is the best method for dyeing. It ensures that you can get the temperature just right, and my pot is big enough to stir whatever I’m dyeing for even consistent coverage. I don’t want to accidentally burn myself transferring boiling water around, so I use the pot on the stove to dye my hair.
You can also use a basin if that makes you feel less uneasy about standing above the stove with flammable material. Once the water boils, you’ll need to transfer it to the basin as safely as possible. Then you will need to, as quickly as possible, get the wig into the water before it starts cooling down.
How long should I keep the wig in the water?
You should keep the wig in the water for at least 30 minutes. According to the website, the first 10 minutes of anything you dye is the most crucial. During this time, you should keep the wig submerged and stir so the color is even. Then after that, check to see how the color looks. The longer it stays in the dye-bath, the richer your color.
How much dye should I use?
It depends on the length of the wig or how much you’re going to dye.
Liquid dye is more concentrated than powder dye, and one bottle of liquid is equal to two packages of powder.
Will water that hot affect the style of the wig? For instance, will a curly wig get ruined in boiling water?
That’s a tricky question. Because you can curl a wig using rollers dipped in boiling water for instance, I would think you can undo a style the same way. But I tested it and the curls stayed put after all was said and done. I recorded the experiment for my other RIT dye fans, here. Basically, this one is at your own risk, I think it depends on the quality of the wig, and the kind of style or curl.
Will RIT dye stain your pots or counters?
I mean, it is a dye… But I’ve found that it doesn’t stain my pot. It did, however, slightly stain my white acrylic stirring spoon. But I assigned that spoon to use only when dyeing, anyway. I also cover my countertops and wear painting clothes. I’ve never seen any stray stain on anything else, and I try to be really careful when dyeing. I also wash everything as soon as I’ve finished.
I hope I answered all your potential questions. If you have any other questions, I’m happy to answer them in the comments, below!
How to Dye a Wig with RIT Dye for a Human Ahsoka Tano Costume
Okay, so with all that being said, let’s create a human Ahsoka wig with RIT dye.
What you will need to create a human Ahsoka wig with RIT dye:
- Your synthetic light-colored (preferably white) wig
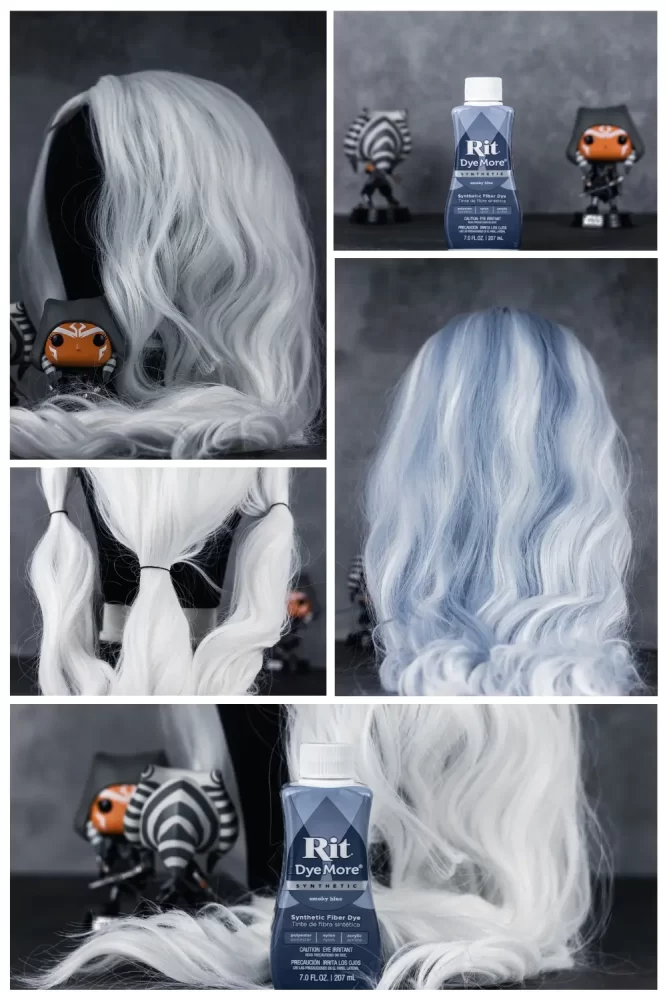
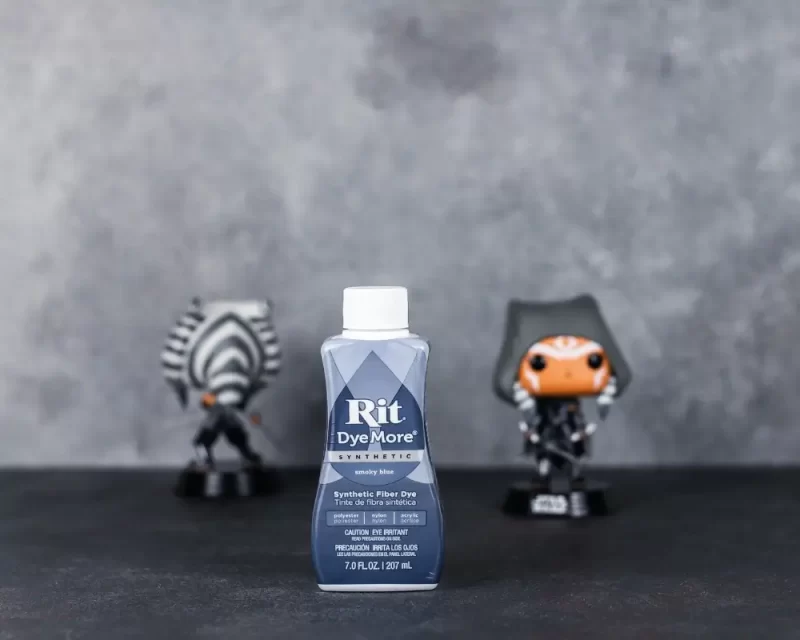
- RIT dye for synthetic fabric in smoky blue
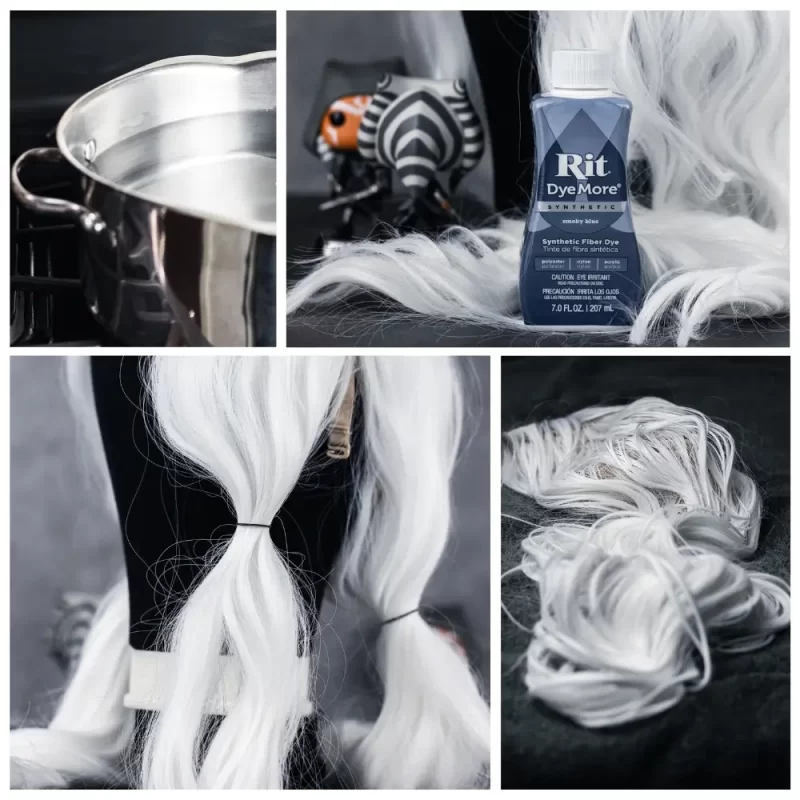
- Stainless Steel pot big enough to fit and stir your wig
- Stirring spoon
- Dishwashing liquid
- A towel you don’t mind getting stained
- Rubber bands if you need to separate specific strands
How to prepare the wig
1. You should wash the wig in cool water. (Always wash your wigs before wearing them, especially if you’ve ordered them online.) The best way to wash your wig is to put cool water and shampoo in a bowl or basin. Use a shampoo that is not harsh – preferably something without sulfates – so it doesn’t get tangled up too badly. Submerge the wig in the water and gently swish it around. Try not to disturb the wig – no need to scrub or tangle the wig. Just let the soapy water pass through the wig and then rinse it in cool water. Gently squeeze the water out and wrap it loosely in a towel to get more water out. Lay the wig out on the towel to air dry. Do not (ever) brush or comb your wig while wet.
2. Lay the wig flat and let it dry completely before handling it. (I’ve read that you should not hang your wig on a wig cap to dry because it stretches out the wig cap. This makes complete sense to me so I’ve started laying my wigs flat on a towel to dry.)
3. I should note here that I like to comb my (dry) wig before dipping it back into the hot dye-water. This is just my way of ensuring that the dye touches every smoothed and detangled strand. If you’re dyeing the entire wig you can probably skip this step. But detangling the wig can’t be all bad, right?
4. This is the point where I pulled out the hair that I was going to actually dye. If you’re dyeing the entire wig, skip to #8.
5. I tried using a bleach streaking cap to pull out equal amounts of strands. You know, the ones from the nineties when streaks were all the Spice Girl rage. Nope. That did not work. The little hook for pulling hair through the holes in the cap only tangled the hair like nothing I’ve ever seen.
6. So I quickly let go of that notion and grabbed my mini-rubber bands. I started at the bottom-back of the wig, parting the wig from left to right. Then I pinned what I wasn’t using out of the way, and pulled small pieces of hair out to secure with rubber bands. I kept repeating this until I finished the whole wig. You will just have to eyeball it for this step. How thick do you want the streaks? How many? This is completely up to you.
7. Now you’ll have to pull those strands that you secured out so that you can tie down the hair you want to keep white. Tie it securely so none gets out or the style will be ruined.

Prepare the Dye-Bath
8. Leave the wig for a minute and fill your pot with water – enough for the wig to move freely. Not enough to spill when you stir, however. Turn on your stove and let the water boil.
9. While the water boils, pull out the rubber bands from the loose sections of hair if you sectioned off your wig. I know – feels like a waste. But that darn streaking cap didn’t work. Take your time. The strands are all over and you don’t want to miss any sections that are in the middle of the wig. I’ll be honest – this was a bit tricky and having three hands would’ve helped. But since I’m not a mutant I just took my time.
10. Once the water boils, turn the stove down just a bit so the boiling stops, but not enough to cool the water below 200⁰F.
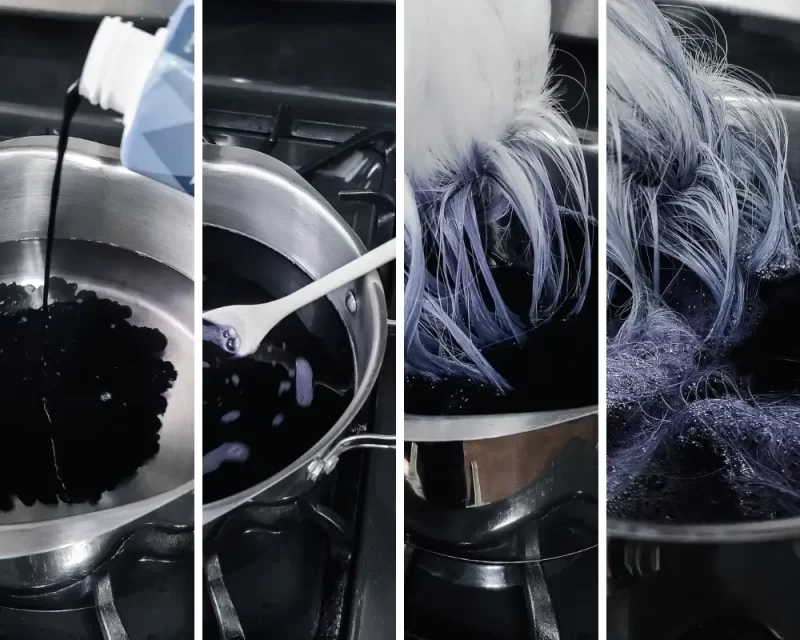
11. Add dish detergent (1 tsp). This helps to keep the dye level. Stir gently.
12. Add the dye. Stir gently.
(This is a new shade and I’m so glad they released it this year! It’s the perfect blue for Ahsoka and I was so pleased with the results.)
13. Now you’re ready to dip the sections of wig in your dye bath. Hold up the hair you don’t want dyed and the wig cap so you don’t get them wet. Be careful not to let go – you’re in this for the duration of the dye time! Dip the sections to be dyed into the water with one hand, and stir with the other while you continue to lower the wig to the point you want dyed.
Please be careful not to burn yourself.
14. Continue to hold the hair and wig cap with one hand while you stir with the other. You will see the color change on the wig immediately, but you should keep it in the water and continue to stir for at least 10 minutes. To be safe, keep the wig submerged for 30 minutes. Check it periodically to make sure the color isn’t getting too dark for what you want, but you should stir it and move it around in the water for the entire time.
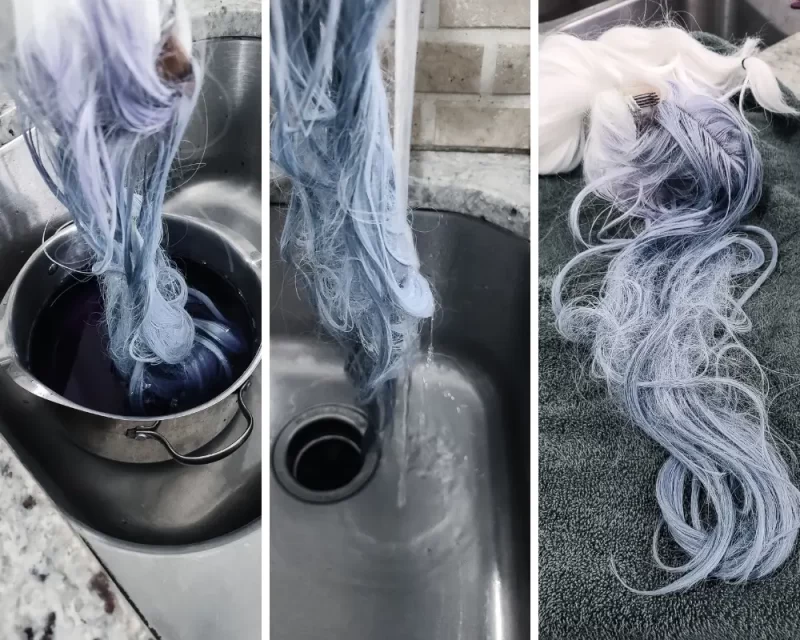
15. When the wig is the color you want, turn off the stove and try to transfer the wig to the sink for rinsing. I like to put down the spoon and carefully lift the entire pot and put it in the empty sink. Again, we only have two hands so please be careful.
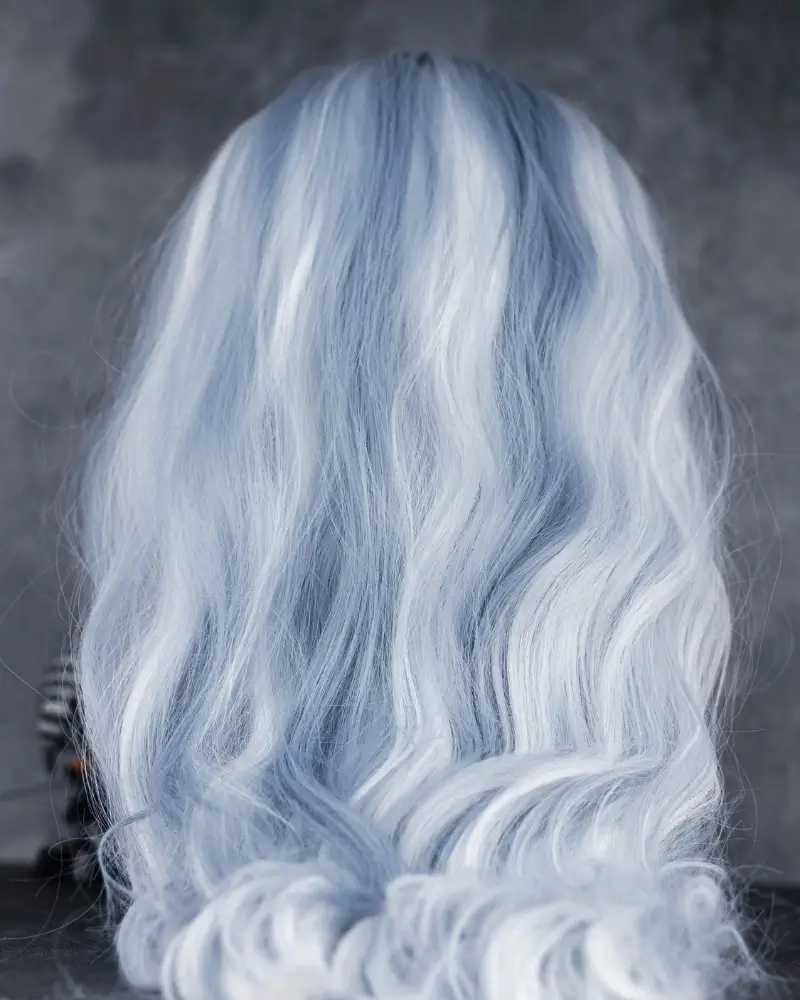
16 Rinse the sections until the water runs clear. Keep in mind that the color will look darker until you rinse it. Then you will see the true shade. Wet the entire wig and wash it again with mild detergent. Be careful not to rub or disturb the hair too much – you’ve already washed it. Rinse your wig thoroughly and press it dry with the towel.
17. Allow the wig to air dry completely before combing or brushing.
You can brush and style your wig once it’s dry.
Complete instructions for dyeing fabric and other things for synthetics are on the RIT website.
Styling the Ahsoka wig
Because Ahsoka has three head-tails, I parted the hair on either side and then left the back part out. I kept out two sections on the top for small space buns that resembled the tips at the top of Ahsoka’s Lekku. I very loosely braided just the bottom part of the three sections and secured the ends with a mini-rubber band. The slight waves in the wig gave the illusion of Ahsoka’s Lekku.
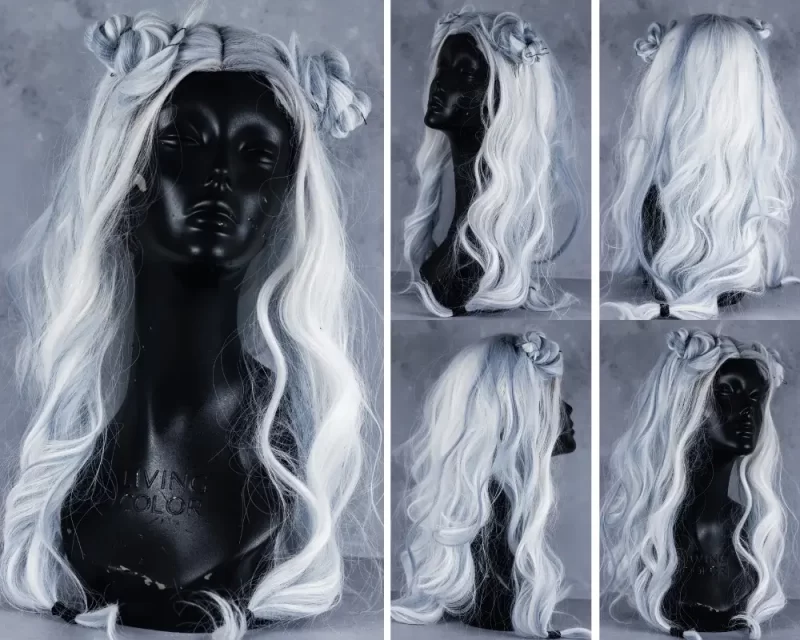
And that’s it!
I was thrilled with how this wig turned out and I can’t wait to dye another one. Dyeing wigs and fabric is kind of like getting a tattoo. You can’t do just one!

I hope these instructions were easy to understand. If you decide to dye a wig using RIT dye, please comment below and let us know how it went.
To see me dye an older wig in an older video, click here.
No Comments